Chapter One: The $15 Bag of Dog Treats That Broke Me
Let me be honest about something embarrassing. Last year, I added up how much I spent on dog treats. Not the good stuff – just the everyday training treats, the bedtime biscuits, the “I’m sorry I left you alone for two hours” cookies. The total was over $600.
Six hundred dollars. For things that are mostly flour, glycerin, and mysterious “natural flavors.”
The final straw was a $15 bag of organic, grain-free, hip-and-joint-supporting, artisanal puppy treats that my dog, Finn, sniffed once and walked away from. Fifteen dollars. Into the trash. Because my spoiled rescue mutt decided he didn’t like the shape.
That’s when I had a thought: I have an oven. I have flour. I have peanut butter. Why am I not making these myself?
But there was one problem. I didn’t want to roll out dough and cut it into little circles like a medieval baker. I wanted something easy, fast, and fun. I wanted cute shapes – paws and bones – because if I’m going to put in the effort, the results should look like they came from a fancy dog boutique.
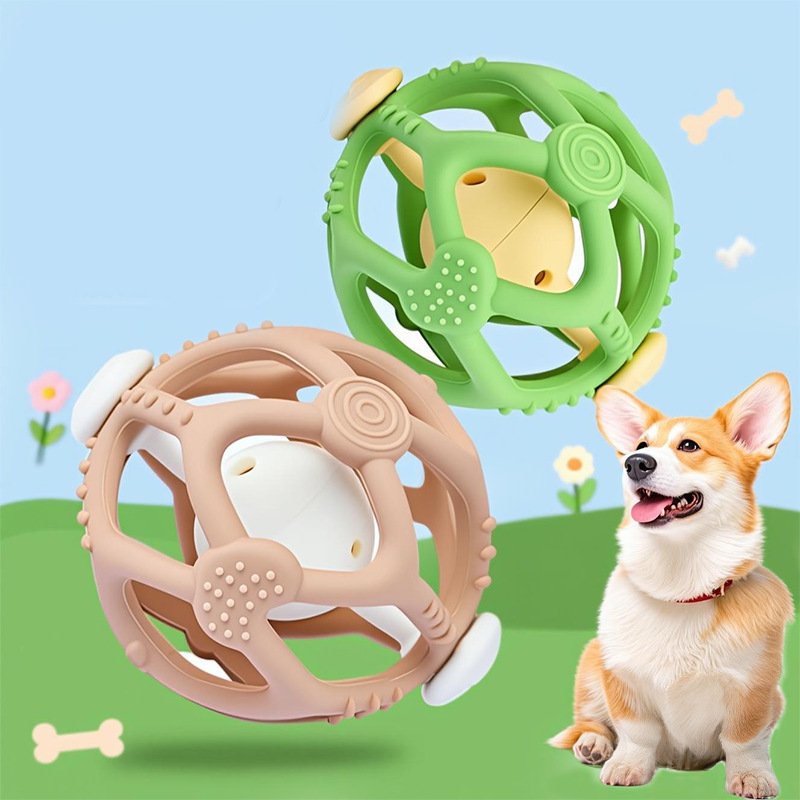
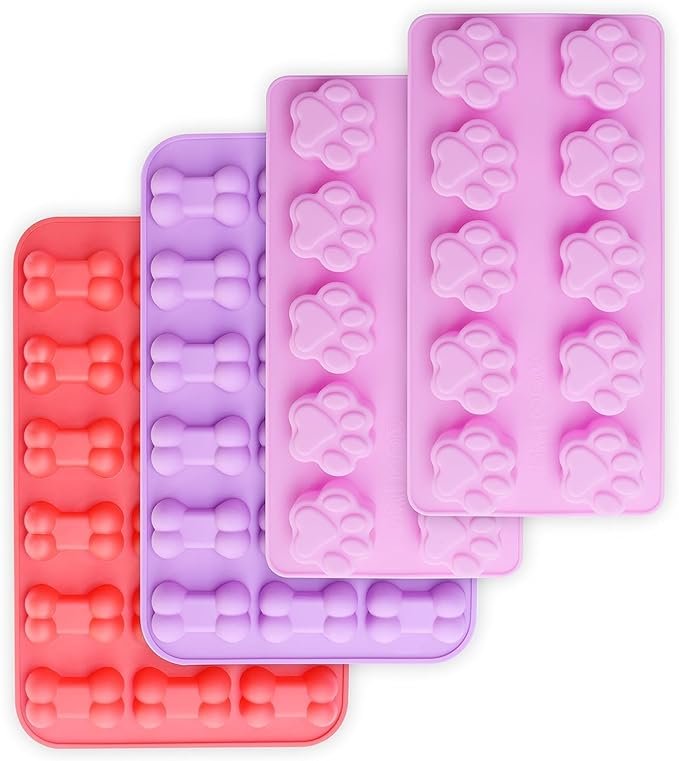
That’s when I found the Puppy Dog Paw and Bone Silicone Molds. A set of four flexible, non-stick, food-grade silicone molds – two pink paw prints and two bone shapes (one purple, one red). And honestly? They changed everything.

Chapter Two: What Exactly Is This Set? (And Why Four Molds?)
Let me describe the product clearly, because the name is a mouthful.
You get four individual silicone molds:
- Two pink puppy paw molds – each paw measures 8.7 inches long by 4.3 inches wide by 0.8 inches deep. That’s a substantial size – each paw mold makes one large treat (or several small ones if you use the individual toe pads creatively).
- Two bone molds – one purple, one red. Each bone measures 9.1 inches by 5.7 inches by 0.6 inches deep. Again, these are generous, bakery-style sizes.
So you have four molds total. Why four? Because variety is the spice of dog life. You can make paw-shaped treats one day, bone-shaped the next. You can use two molds at once (they fit side by side on a standard cookie sheet). You can even use them simultaneously for different recipes – one batch of pumpkin-peanut butter paws and one batch of chicken-and-sweet-potato bones.
The colors are bright and cheerful – pink, purple, red. They’re easy to spot in a crowded drawer. And because they’re silicone, they’re flexible, so popping out frozen treats or baked goods is as easy as bending the mold and watching the treat fall out.
But the real story is what these molds are made of – because not all silicone is safe for your dog.

Chapter Three: Food-Grade Silicone – The Only Safe Choice for Homemade Dog Treats
Here’s something that surprised me when I started researching treat molds. A lot of silicone products on Amazon are cheap, poorly made, and potentially toxic. They’re made with fillers, low-quality silicones, or even non-food-safe materials that can leach chemicals when heated.
The Puppy Dog Paw and Bone molds are made from 100% food-grade silicone. That means:
- Non-toxic – no nasty chemicals migrating into your dog’s treats.
- BPA-free – that’s the bare minimum, but these molds go beyond.
- Heat resistant – from -40°F all the way up to +446°F.
- No weird smells – cheap silicone often has a chemical odor. These don’t.
Let me emphasize the temperature range. -40°F to +446°F. That’s insane versatility. You can:
- Bake in the oven up to 446°F (though for dog treats, you’ll rarely go above 350°F).
- Freeze for frozen treats – the molds won’t crack or become brittle.
- Microwave for quick melting of chocolate or heating of ingredients.
- Dishwasher for effortless cleaning.
Most plastic trays can’t handle freezing and baking in the same product. Silicone can. That means one set of molds does the work of three different kitchen tools.
But here’s the most important point for dog owners: food-grade silicone is safe for direct contact with food that your dog will eat. No lead. No phthalates. No BPA. Just a clean, inert surface that won’t react with peanut butter, pumpkin puree, yogurt, or any other treat ingredient.
You wouldn’t feed your dog from a cheap plastic bowl that leaches chemicals. Don’t make treats in cheap molds that do the same thing.

Chapter Four: The Dimensions – Big Enough to Matter, Small Enough to Be Cute
Let’s talk size, because treat molds come in two extremes: tiny little ice-cube-sized things that make treats the size of a pea, or giant cake pans that make a single massive bone the size of your forearm.
The Puppy Paw and Bone molds hit the sweet spot.
Paw mold: 8.7″ x 4.3″ x 0.8″
That’s about the size of a small smartphone. Each paw mold produces one complete paw print – with four toe pads and one large palm pad. The depth (0.8 inches) means you can make treats that are thick, substantial, and satisfying for a dog to chew. Not a flimsy cracker – a real cookie.
Bone mold: 9.1″ x 5.7″ x 0.6″
Slightly longer, slightly wider, slightly shallower. This produces a classic dog bone shape with rounded ends. The 0.6-inch depth is perfect for baked treats that are firm but not rock-hard.
For context, a treat made in the bone mold is roughly the size of a medium Milk-Bone – but you control the ingredients. For a small dog (under 15 lbs), one bone might be two or three training treats. For a medium or large dog, it’s a perfect single serving.
The molds are also shallow enough that treats bake evenly and freeze quickly. No raw centers. No ice crystals. Just consistent, professional-looking results.
And because you have two of each shape, you can batch-produce. One afternoon of baking can yield six to eight large treats (if you fill each mold completely) or dozens of smaller treats if you use the individual paw-toe compartments.

Chapter Five: Non-Stick Magic – Why You’ll Never Grease a Pan Again
If you’ve ever made homemade dog treats using a metal pan or a regular muffin tin, you know the pain. You spray oil. You flour the surface. You pray. And then you spend fifteen minutes with a butter knife trying to pry a stuck treat out of a corner, only to have it crumble into sad little pieces.
Silicone molds eliminate that problem completely.
The non-stick surface is built into the material itself. You don’t need oil. You don’t need cooking spray. You don’t need parchment paper. You simply mix your ingredients, spoon them into the mold, bake or freeze, and then – here’s the satisfying part – you flex the mold.
Bend it. Twist it gently. The treats pop right out. Whole. Perfect. With all the paw toes intact.
I’ve made peanut butter and oat treats that were notoriously sticky. They slid out of the silicone mold like ice cubes from a tray. I’ve made frozen yogurt and blueberry pupsicles. A quick twist, and they released cleanly.
This non-stick property also makes cleaning absurdly easy. Any residue rinses off with warm water. And because the molds are dishwasher safe, you can just toss them on the top rack and forget about them.
No scrubbing. No soaking. No cursing at a ruined batch of treats that you spent an hour preparing.

Chapter Six: Endless Recipes – Not Just for Dogs (But Mostly for Dogs)
The molds are marketed for dog treats, and that’s how I use them 90% of the time. But the versatility is remarkable. Because they’re food-grade silicone, you can use them for pretty much anything you’d use a silicone mold for.
For your dog:
- Baked dog treats – The classic. Mix whole wheat flour, peanut butter (xylitol-free!), pumpkin puree, and an egg. Spoon into molds. Bake at 350°F for 12-15 minutes. Pop out. Your dog will lose his mind.
- Frozen pupsicles – Blend plain yogurt, pureed fruit (blueberries, banana), and a little water. Pour into molds. Freeze for 4 hours. Perfect for hot summer days or teething puppies.
- Layered treats – Pour a layer of pumpkin mixture, freeze partially, then add a layer of yogurt. Creates fancy two-tone treats that look like they came from a dog bakery.
- Grain-free and low-ingredient treats – For dogs with allergies, you can make simple treats with just sweet potato and coconut flour. The molds hold their shape beautifully.
- Training treats – Use the individual toe compartments of the paw mold to make tiny, bite-sized rewards. Much cheaper than store-bought training treats.
For you (yes, humans can use these too):
- Chocolates – Melt chocolate, pour into paw or bone shapes, let set. You now have adorable chocolate paws for a dog-themed party or a gift for a fellow pet lover.
- Candies and gummies – Use flavored gelatin or homemade caramel. The bone shape is perfect for novelty candies.
- Jelly or jello – Make individual fruit jellies in fun shapes. Kids love them.
- Ice cubes – Giant paw-shaped ice cubes for punch bowls or summer cocktails. Talk about a conversation starter.
- Soap or wax melts – If you’re into crafts, these molds are great for melt-and-pour soap or scented wax tarts. (Just don’t use the same molds for food after using them for soap – have dedicated sets.)
- Mini cakes or brownies – Pour brownie batter into the bone mold. Bake. You get a brownie that looks like a dog bone. Great for a kid’s birthday party or a gag gift.
I’ve personally used the bone mold to make chocolate lollipops for a friend’s “Puppy Themed” baby shower. They were a hit. The paw mold I’ve used for frozen dog treats and, yes, for giant ice cubes in my iced coffee (the paw slowly melts, releasing coffee – it’s silly but fun).
The point is: these four molds are not a one-trick pony. They’re a multi-use kitchen tool that happens to be perfect for dog treats.
Chapter Seven: The Temperature Extremes – From Deep Freeze to Hot Oven
One of the most impressive features of these molds is their temperature tolerance. -40°F to +446°F.
Let me put that in perspective.
- A standard home freezer is around 0°F. These molds are safe down to forty degrees below zero – colder than any residential freezer will ever go. So freezing is no problem at all.
- A standard home oven maxes out around 500°F for self-cleaning, but normal baking is 350°F to 425°F. These molds are safe up to 446°F, which covers every baking recipe you’ll ever use for dog treats.
- The microwave safe rating means you can melt butter, chocolate, or coconut oil directly in the mold. No need for a separate bowl.
- The dishwasher safe rating (top rack recommended) means cleaning is effortless – even after sticky peanut butter recipes.
I’ve put these molds through the wringer. Baked at 375°F. Froze solid at -10°F (my freezer runs cold). Ran through the dishwasher on high heat. No warping. No melting. No cracking. No weird smells. They look and perform exactly like day one.
Cheap silicone molds often fail at the extremes. They might warp in the oven or become brittle in the freezer. These don’t. The quality is evident the first time you use them.
Chapter Eight: Safety First – Why “BPA Free” Is Not Enough
Let me take a moment to talk about safety, because this matters more than shape or color.
When you buy silicone products, especially from unknown brands, you need to look for three things:
- BPA-free – This is standard now, but some cheap imports still contain BPA. These molds are BPA-free.
- Food-grade silicone – This means the silicone has been tested and certified for direct food contact. It’s not industrial silicone or a silicone blend with fillers. These molds are 100% food-grade.
- No fillers – Some manufacturers mix silicone with cheaper materials to reduce cost. Those fillers can leach chemicals or break down over time. These molds are pure silicone.
The Puppy Dog Paw and Bone molds have been tested for safety. They are non-toxic, heat stable, and chemically inert. You can feel confident giving treats made in these molds to your dog – even a puppy with a sensitive stomach or a senior dog with health issues.
One more safety note: The manufacturer suggests placing the molds on a cookie sheet before putting them in the oven or moving them. This is good advice for any silicone mold. Silicone is flexible, so a cookie sheet provides stability and makes it easy to transfer the molds in and out of the oven without spilling. Do not place silicone molds directly on an oven rack unless they are specifically designed for that (these are not, so use a baking sheet).
Chapter Nine: Cost Savings – The $600 Problem Solved
Remember how I said I spent over $600 on dog treats last year? Let me break down the math of switching to homemade treats with these molds.
Store-bought premium treats: 12−20 per bag. A bag might last two weeks if you have a medium dog. That’s 300−500 per year, minimum.
Homemade treats using molds:
- Flour (whole wheat or oat): $0.50 per batch
- Peanut butter (xylitol-free): $0.75 per batch
- Pumpkin puree: $0.50 per batch
- Egg: 0.30perbatchTotalingredientsperbatch: 2.00
Each batch fills all four molds completely, yielding roughly 4 large treats (or 8-10 smaller treats if you break the paw into toe sections). That’s about $0.50 per large treat – or less.
But here’s the real savings: you can make treats in bulk. One afternoon of baking can produce two weeks of treats for a cost of about 4.Overayear,that’sroughly100 in ingredients.
Compared to 600instore−boughttreats,yousave∗∗500 per year**. The molds themselves cost less than a single bag of artisanal dog cookies. They pay for themselves in the first week.
And that’s just treats. If you use the molds for human chocolates, candies, or frozen desserts, the savings multiply.
Chapter Ten: Easy Cleaning – Because Nobody Wants to Scrub Paw Prints
I’ll be honest. When I first saw the paw mold with all its little toe compartments, I thought: That’s going to be impossible to clean.
I was wrong.
Because the molds are non-stick silicone, nothing really sticks. After baking treats, there might be a light residue. I simply run the mold under warm water and wipe with a soft sponge. Everything comes off. The little toe compartments are smooth, not textured, so they don’t trap crumbs.
For a deeper clean, I put the molds in the dishwasher (top rack). They come out sparkling. No hand-scrubbing required.
One tip: If you’re making frozen treats (like yogurt pupsicles), let the mold sit at room temperature for a minute before trying to pop them out. The slight thawing helps release the treats. Then rinse the mold with warm water to remove any yogurt residue.
Compared to metal pans that require greasing, scrubbing, and sometimes soaking, silicone molds are a dream.
Chapter Eleven: Perfect for Gifts – Because Everyone Loves a Paw-Shaped Cookie
Here’s an unexpected benefit: these molds make you look like a thoughtful, creative gift-giver.
Imagine this: You bake a batch of dog treats in the bone and paw shapes. You let them cool. You put them in a clear cellophane bag with a ribbon. You attach a tag that says “Homemade with love for your pup.” You give it to your dog-owning friend for their birthday.
Cost to you: about $2 in ingredients and five minutes of packaging. Perceived value: priceless.
I’ve done this for every dog owner in my life. They love it. It’s personal, it’s useful, and it shows you care. Plus, you get to be the person who gives the unique gift, not another scented candle.
You can also use the molds to make human treats for dog lovers. Chocolate paws for a coworker who adores her golden retriever. Bone-shaped brownies for a kid’s party. The possibilities are endless.
Chapter Twelve: The Learning Curve – How to Get Perfect Treats Every Time
If you’ve never used silicone molds before, here are a few tips to ensure success:
1. Don’t overfill. The molds have a specific depth. Fill to just below the rim. Overfilling leads to mushroom-shaped treats that stick to the edges.
2. Use a cookie sheet. As the manufacturer suggests, place the molds on a baking sheet before filling and moving to the oven. This prevents spills and makes handling easier.
3. Tap out air bubbles. For liquid batters (like yogurt or melted chocolate), gently tap the cookie sheet on the counter to bring air bubbles to the surface. Pop them with a toothpick for a smooth finish.
4. Let treats cool completely. If you try to pop baked treats out while they’re hot, they might crumble. Let them cool in the mold for 10-15 minutes, then flex the mold.
5. Freeze first for sticky recipes. For very sticky batters (like pureed sweet potato), pop the mold in the freezer for 20 minutes before unmolding. The cold firms everything up, making release easier.
6. Wash before first use. Even though the molds are food-grade, wash them with soap and water before the first use to remove any manufacturing residue.
Follow these tips, and you’ll get perfect treats on your very first try.
Chapter Thirteen: Comparing to Other Molds – Why This Set Wins
I’ve tried other silicone molds. Single bone molds that cost $12 each. Tiny ice-cube trays that make treats the size of a pea. Flimsy molds that flip over when you try to fill them.
The Puppy Dog Paw and Bone set wins on several fronts:
- Value: Four molds for the price of one or two from other brands.
- Size: The 8-9 inch length is perfect – not too big, not too small.
- Shapes: Paws and bones are the classic dog treat shapes. No weird stars or hearts that dogs don’t care about.
- Color coding: Pink paws, purple and red bones – easy to distinguish if you’re making different recipes.
- Thickness: The 0.6-0.8 inch depth produces substantial treats, not wafers.
- Temperature range: -40 to +446°F covers everything you’d ever need.
I’ve seen cheaper molds on eBay. They smell like chemicals. They warp in the oven. They’re not truly non-stick. I’ve seen more expensive molds that are essentially the same thing but with a brand name. This set hits the sweet spot of quality and price.
Chapter Fourteen: The Verdict – A Small Investment for a Big Return
The Puppy Dog Paw and Bone Silicone Molds are not a glamorous product. They’re not going to win design awards or go viral on TikTok. They’re just four pieces of flexible silicone in cheerful colors.
But they have transformed the way I feed my dog.
I no longer spend $15 on a bag of treats that might go stale or get rejected. I make exactly what I need, when I need it. I control every ingredient – no preservatives, no mystery meats, no artificial colors. I save hundreds of dollars a year. And I get the joy of seeing my dog’s tail wag when he sees me pulling out the paw-shaped cookies.
Plus, I have the flexibility to make frozen summer treats, chocolate gifts for friends, and even the occasional giant paw-shaped ice cube just because it makes me smile.
If you own a dog – especially a puppy who needs lots of training treats or a senior dog with dietary restrictions – these molds are a no-brainer. They cost less than a pizza. They last for years. And they turn your kitchen into a dog bakery with almost zero effort.
So go ahead. Buy the set. Make a batch of peanut butter paws. Watch your dog lose his mind with happiness. And then calculate how much money you just saved compared to the pet store.
You’ll never buy a bag of overpriced, mystery-ingredient dog treats again.